React Native Integrating Push Notifications with firebase and react native push notification with navigate to screen
React Native
Push Notifications
firebase
navigate
screen
react-native-firebase
react-native-push-notification
- By Code solution
- Nov 28th, 2021
- 0 comments
- 14
In this post, we’ll learn how to set up push notifications in React Native apps using Firebase. We’ll send notifications using the Firebase console and receive them in the app. We will also learn how to handle push notifications in your React Native apps. By handling, I mean how to access the data sent via the notification inside your app, and wake your app up if it is asleep or closed.
Because all this can get really long, I’ll limit the discussion to Android apps alone. I will post another blog for a push in iOS apps in React Native. (Really, the major difference is in setting up the push certificates for the iOS app, that’s all)
Structure
I will go ahead in a step-by-step fashion so you can follow easily.
- Create a Firebase project and find Push options
- Create a basic React Native app
- Install Push notification dependency
- Build the app on Android
- Send notifications from the Firebase console
- Handle different types of Push notifications in your app
1. Create a Firebase project and find Push options
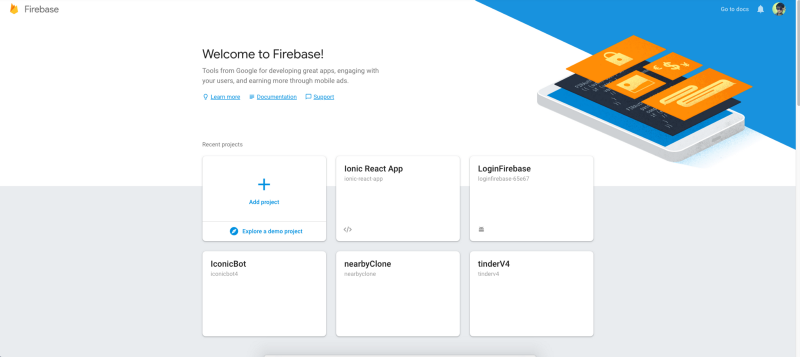
Go to Firebase and create your first project (or use an existing one). Your console should look like this

Your Firebase projects all in one place
Note — It’s really easy to create a Firebase project, but if you still face any issue, follow step 1–4 of this blog
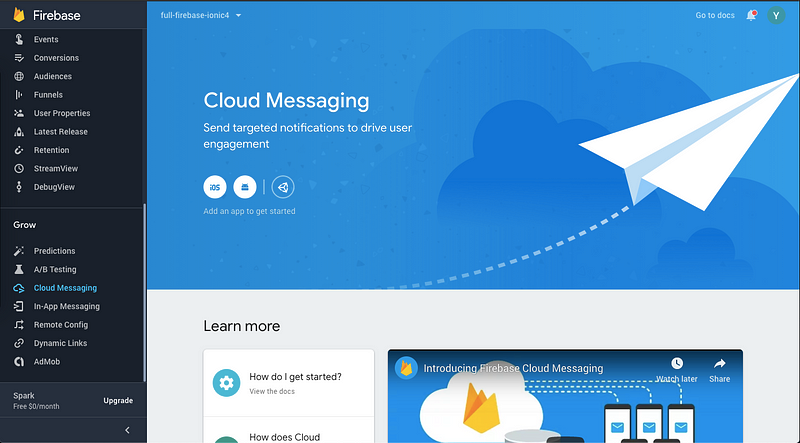
Click on your project and you’ll enter the project’s dashboard. Look for Cloud Messaging tab. This is where the magic will happen !

Cloud messaging section of Firebase console — You can send push notifications from here
Push Notifications Settings
Firebase console also contains push notifications settings for the web, android, and iOS. Here you can find your sender_id, upload iOS push certificates, etc. For setting up options, you’ll first have to create an Android app in the Firebase console.

Add a new Android app in Firebase
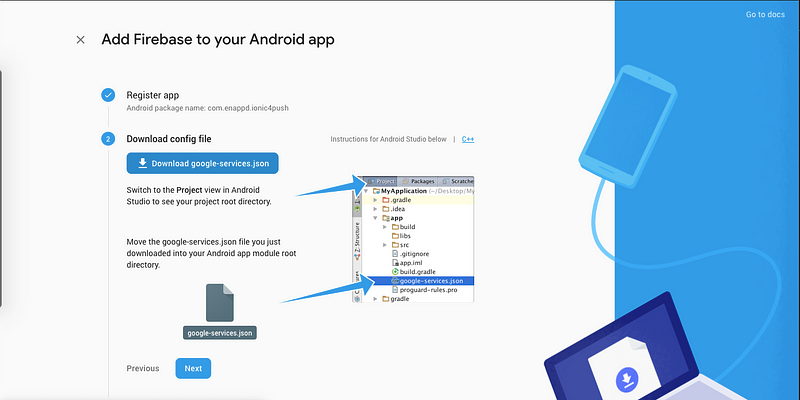
During the process, it will ask you to enter the app’s package name and provide google-services.json. Make sure you keep a unique package name/bundle ID for your app. (If we create a new project called “HelloWorld” using react-native CLI, by default package name for the android project will be “com.RNPushNotification” and the default bundle identifier for iOS app will be “org.reactjs.native.example.RNPushNotification”., don’t use the default package name)

Download google-services.json
2. Create a basic React Native app
First, make sure you have all pre-requisites to create a react-native app as per the official documentation.
Create a blank react-native app (Replace myApp with your own name)
$ react-native init myApp
This will create a basic React-native app that you can run on a device or simulator. (either Android or iOS)
Let’s run the app on Android using
$ react-native run-android
3. Install Push notification dependency
There are two major dependency/plugin you can use to implement push notifications
- react-native-push-notification
- @react-native-firebase/app
- @react-native-firebase/messaging
- @react-navigation/native
- @react-navigation/stack
- react-native-safe-area-context
react-native-firebase is a major plugin that can implement almost all Firebase functionalities in react-native. But for this tutorial, we’ll use the react-native-push-notification plugin, which is made only for Push Notification purposes.
Install the dependency using
$ npm install --save react-native-push-notification @react-native-firebase/app @react-native-firebase/messaging / yarn add react-native-push-notification @react-native-firebase/app @react-native-firebase/messaging
1. Edit android/build.gradle
In your android/build.gradle , edit the googlePlayServicesVersion and firebaseVersion . Following are the values in my (working) setup
  ext {
     buildToolsVersion = "30.0.2"
     minSdkVersion = 27
     compileSdkVersion = 31
     targetSdkVersion = 31
     ndkVersion = "26.4.7075529"
     googlePlayServicesVersion = "17.0.0"
     firebaseMessagingVersion = '21.1.0'
     kotlin_version = '1.2.10'
 }
 dependencies {
     classpath("com.android.tools.build:gradle:4.1.1")
     classpath 'com.google.gms:google-services:4.3.10'
     // NOTE: Do not place your application dependencies here; they belong
     // in the individual module build.gradle files
 }
In your android/app/build.gradle , add apply plugin
apply plugin: 'com.google.gms.google-services'

defaultConfig {
    applicationId "com.rnpushnotification"
    minSdkVersion rootProject.ext.minSdkVersion
    targetSdkVersion rootProject.ext.targetSdkVersion
    versionCode 1
    versionName "1.0"
    multiDexEnabled true
}
compileOptions {
    sourceCompatibility JavaVersion.VERSION_1_8
    targetCompatibility JavaVersion.VERSION_1_8
}

implementation 'androidx.multidex:multidex:2.0.1'
2. Edit AndroidManifest.xml
In your AndroidManifest.xml , add following before <application
<uses-permission android:name="android.permission.VIBRATE" />
<uses-permission android:name="android.permission.RECEIVE_BOOT_COMPLETED"/>
<application .......>
< meta - data android: name = "com.dieam.reactnativepushnotification.notification_foreground"
android: value = "true" / >

    <meta - data android: name = "com.dieam.reactnativepushnotification.notification_color"
android: resource = "@color/white" / >
    <meta - data android: name = "com.dieam.reactnativepushnotification.notification_icon"
android: resource = "@mipmap/ic_launcher" / >

    <meta - data android: name = "com.google.firebase.messaging.default_notification_icon"
android: resource = "@mipmap/ic_launcher" / >

    <receiver android: name = "com.dieam.reactnativepushnotification.modules.RNPushNotificationActions" / >
    <receiver android: name = "com.dieam.reactnativepushnotification.modules.RNPushNotificationPublisher" / >
    <receiver android: name = "com.dieam.reactnativepushnotification.modules.RNPushNotificationBootEventReceiver" >
    <intent - filter >
    <action android: name = "android.intent.action.BOOT_COMPLETED" / >
    <action android: name = "android.intent.action.QUICKBOOT_POWERON" / >
    <action android: name = "com.htc.intent.action.QUICKBOOT_POWERON" / >
    </intent-filter> </receiver>

    <service
android: name = "com.dieam.reactnativepushnotification.modules.RNPushNotificationListenerService"
android: exported = "false" >
    <intent - filter >
    <action android: name = "com.google.firebase.MESSAGING_EVENT" / >
    </intent-filter>
    </service>
... </application>
Be careful while copy-pasting these values. Don’t disturb other values in the XML file.
3. Create a Color resource
In step 3.2 above, we called for a white color as the notification_color. If that does not exist in your project, create it. You can also change this to any color you want. Create the android/app/src/res/values/colors.xml file if it does not exist
<resources>
<color name="white">#FFF</color>
</resources>
4. Project Folder Structure
android
ios
node_modules
src
     notification
         FCMService.js
         LocalNotificationService.js
     routes
         index.js
     screens
         Home
             index.js
        List
            index.js
     RootNavigation.js
app.json
App.js
babel.config.js
index.js
metro.config.js
package.json
- create a screen folder and add folder and file like project Folder Structure and add code
Home.js
import React from 'react'
import {
    View,
    Text,
    SafeAreaView,
    Button
} from 'react-native'

const Home = ({
    navigation
}) => {
    console.log("navigation", navigation)
    return ( <
        SafeAreaView style = {
            {
                flex: 1,
                justifyContent: 'center',
            }
        } >
        <
        View style = {
            {
                justifyContent: 'center',
                alignItems: 'center',
                alignContent: 'center'
            }
        } >
        <
        Text > Home Page < /Text>  <
        Button title = "list page"
        onPress = {
            () => navigation.navigate("List")
        }
        /> <
        /View> <
        /SafeAreaView>
    )
}

export default Home
List.js
import React from 'react'
import {
    View,
    Text,
    SafeAreaView,
    Button
} from 'react-native'

const List = ({
    navigation
}) => {
    console.log("navigation", navigation)
    return ( <
        SafeAreaView style = {
            {
                flex: 1,
                justifyContent: 'center',
            }
        } >
        <
        View style = {
            {
                justifyContent: 'center',
                alignItems: 'center',
                alignContent: 'center'
            }
        } >
        <
        Text > Home Page < /Text>  <
        Button title = "Go To Home"
        onPress = {
            () => navigation.navigate("Home")
        }
        /> <
        /View> <
        /SafeAreaView>
    )
}

export default List
- create a routes folder create index.js file in routes folder routes/index.js
import React from 'react';

import {
    createStackNavigator
} from '@react-navigation/stack';
import Home from '../screen/Home';
import List from '../screen/List';

const Stack = createStackNavigator();
const headerOptions = {
    headerShown: false
}
const PageRoutes = () => ( <
    Stack.Navigator screenOptions = {
        headerOptions
    } >
    <
    Stack.Screen name = "Home"
    component = {
        Home
    }
    /> <
    Stack.Screen name = "List"
    component = {
        List
    }
    /> <
    /Stack.Navigator>
);

export default PageRoutes;
- create a notification folder and add/create file like project Folder Structure and add code
FCMService.js
import messaging from '@react-native-firebase/messaging';
import {
    Platform
} from 'react-native';
import {
    localNotificationService
} from './LocalNotificationService';

class FCMService {
    register = (onRegister, onNotification, onOpenNotification) => {
        this.checkPermission(onRegister);
        this.createNotificationListeners(onRegister, onNotification, onOpenNotification);
    }

    registerAppWithFCM = async () => {
        if (Platform.OS === 'ios') {
            await messaging().registerDeviceForRemoteMessages();
            await messaging().setAutoInitEnabled();
        }
    }

    checkPermission = (onRegister) => {
        messaging().hasPermission()
            .then(enabled => {
                if (enabled) {
                    // User has permission
                    this.getToken(onRegister);
                } else {
                    // User don't have permission
                    this.requestPermission(onRegister);
                }
            }).catch(error => {
                console.log("[FCMService] Permission Rejected", error);
            })
    }

    getToken = (onRegister) => {
        messaging().getToken()
            .then(fcmToken => {
                if (fcmToken) {
                    onRegister(fcmToken)
                } else {
                    console.log("[FCMService] User does not have a devices token")
                }
            }).catch(error => {
                console.log("[FCMService] getToken Rejected", error);
            })
    }

    requestPermission = (onRegister) => {
        messaging().requestPermission()
            .then(() => {
                this.getToken(onRegister);
            }).catch(error => {
                console.log("[FCMService] Request Permission Rejected", error);
            })
    }

    deleteToken = () => {
        console.log("[FCMService] Delete Token");
        messaging().deleteToken()
            .catch(error => {
                console.log("[FCMService] Delete Token Error", error);
            })
    }

    createNotificationListeners = (onRegister, onNotification, onOpenNotification) => {

        // When Application Running on Background
        messaging().onNotificationOpenedApp(remoteMessage => {
            console.log("[FCMService] OnNotificationOpenedApp getInitialNotification", remoteMessage);
            if (remoteMessage) {
                const notification = remoteMessage;
                onOpenNotification(notification);
            }
        });

        //When Application open from quit state
        messaging().getInitialNotification()
            .then(remoteMessage => {
                console.log("[FCMService] getInitialNotification getInitialNotification", remoteMessage);
                if (remoteMessage) {
                    const notification = remoteMessage;
                    localNotificationService.cancelAllLocalNotifications();
                    onOpenNotification(notification);
                }
            });

        //Forground state message
        this.messageListener = messaging().onMessage(async remoteMessage => {
            console.log("[FCMService] A new FCm message arrived", remoteMessage);
            if (remoteMessage) {
                let notification = null;
                if (Platform.OS === 'ios') {
                    notification = remoteMessage.data
                } else {
                    notification = remoteMessage
                }

                onNotification(notification);
            }
        });

        // Triggered when have new Token
        messaging().onTokenRefresh(fcmToken => {
            console.log("[FCMService] New token refresh", fcmToken);
            onRegister(fcmToken);
        });
    }

    unRegister = () => {
        this.messageListener();
    }

    stopAlarmRing = async () => {
        if (Platform.OS != 'ios') {
            await messaging().stopAlarmRing();
            console.log('sdfghjkldfgh', "stopAlarmRing");
        }
    }
}
export const fcmService = new FCMService()
LocalNotificationService.js
import PushNotification from "react-native-push-notification"

class LocalNotificationService {
    configure = (onOpenNotification) => {
        PushNotification.configure({
            onRegister: function(token) {
                console.log("[LocalNotificationService] onRegister:", token);
            },
            onNotification: function(notification) {
                console.log("[LocalNotificationService] onNotification:", notification);
                if (!notification?.data) {
                    return
                }
                notification.userInteraction = true;
                onOpenNotification(notification);
            },
            // IOS ONLY (optional): default: all - Permissions to register.
            permissions: {
                alert: true,
                badge: true,
                sound: true,
            },

            // Should the initial notification be popped automatically
            // default: true
            popInitialNotification: true,

            /**
             * (optional) default: true
             * - Specified if permissions (ios) and token (android and ios) will requested or not,
             * - if not, you must call PushNotificationsHandler.requestPermissions() later
             * - if you are not using remote notification or do not have Firebase installed, use this:
             *     requestPermissions: Platform.OS === 'ios'
             */
            requestPermissions: true,
        })
    }

    unregister = () => {
        PushNotification.unregister();
    }

    showNotification = (id, title, message, data = {}, options = {}) => {
        PushNotification.localNotification({
            /* Android Only Properties */
            ...this.buildAndroidNotification(id, title, message, data, options),
            title: title || "",
            message: message || "",
            playSound: options.playSound || false,
            soundName: options.soundName || 'default',
            userInteraction: false, // BOOLEAN : If notification was opened by the user from notification
            channelId: "32",
            badge: true,
        });
    }

    buildAndroidNotification = (id, title, message, data = {}, options = {}) => {
        return {
            id: id,
            autoCancel: true,
            largeIcon: options.largeIcon || "ic_launcher",
            smallIcon: options.smallIcon || "ic_notification",
            bigText: message || '',
            subText: title || '',
            vibrate: options.vibrate || true,
            vibration: options.vibration || 300,
            priority: options.priority || 'high',
            importance: options.importance || 'high',
            data: data,
        }
    }

    cancelAllLocalNotifications = () => {
        PushNotification.cancelAllLocalNotifications();
    }

    removeDeliveredNotificationByID = (notificationId) => {
        console.log("[LocalNotificationService] removeDeliveredNotificationByID:", notificationId);
        PushNotification.cancelLocalNotifications({
            id: `${notificationId}`
        })
    }

    // applicationBadge = () => {
    //     // PushNotification.setApplicationIconBadgeNumber(2);
    //     // const ShortcutBadger = NativeModules.ShortcutBadger;
    //     // let count = 1;
    //     // ShortcutBadger.applyCount(count);
    // }
}

export const localNotificationService = new LocalNotificationService();
- create a RootNavigation.js file in the src folder and add code
import * as React from 'react';

export const navigationRef = React.createRef();

export function navigate(name, params) {
    navigationRef.current?.navigate(name, params);
}
- open an App.js file add code
import React, {
    useEffect
} from 'react';
import {
    NavigationContainer
} from '@react-navigation/native';
import PageRoutes from './src/routes';
import {
    fcmService
} from './src/notification/FCMService';
import {
    localNotificationService
} from './src/notification/LocalNotificationService';
import {
    navigationRef,
    navigate
} from './src/RootNavigation';

const App = () => {
    useEffect(() => {
        fcmService.registerAppWithFCM();
        fcmService.register(onRegister, onNotification, onOpenNotification);
        localNotificationService.configure(onOpenNotification)
    }, []);


    const onRegister = (token) => {
        console.log("[App] Token", token);
    }

    const onNotification = (notify) => {
        // console.log("[App] onNotification", notify);
        const options = {
            soundName: 'default',
            playSound: true,
            largeIcon: "ic_launcher", // (optional) default: "ic_launcher"
            smallIcon: "ic_launcher", // (optional) default:  "ic_notification" with fallback for "ic_launcher"
        }

        localNotificationService.showNotification(
            0,
            notify.notification.title,
            notify.notification.body,
            notify,
            options,
        )
    }

    const onOpenNotification = async (notify) => {
        console.log('notify', notify);
        if (notify && notify.data && notify.data.page == "list") {
            navigate('List', notify.data);
        } else if (notify && notify.data && notify.data.page == "home") {
            navigate('Home', notify.data);
        }
    }

    return ( <
        NavigationContainer ref = {
            navigationRef
        } >
        <
        PageRoutes / >
        <
        /NavigationContainer>
    );
};

export default App;
Hope this tutorial saves your time and makes FCM integration easy in react native. If it helps you in any way, don’t forget to love! Thanks :)